Friday, May 6, 2011

Create Each Of Widget Box Separately


If we are visiting one Blog or website into another one, we may notice that some of Blog appearance looks nice by creating box separately both main post and widget. Some of webmaster will do it to get more professional compare with just a normal blog. Mostly, when visitor is coming into your Blog, the first impression is how to design your Blog, this can interact visitor to stay along time to your Blog. That is why, i recommend you to apply this way in order to optimize your Blog appearance. The example like showing below screenshot:


The question is how we do that, of course we must to add CSS code inside our template. Normally, there have two parts which are sidebar widget ( All widgets that you have will be customized into box separately from another widget ) and main widget (this is where the area you usually post the article ), but don’t worry that all are easy as long as you follow some simple steps below:

  1. first in first, Log in to your blogger account
  2. Choose Design> Edit HTML element (important: always backup your template before add code inside)
  3. Now, you must find the script like below, looks the CSS code combines to become one.
            
            sidebar widget, .main .widget { 
            border-bottom:1px dotted $bordercolor;
            margin:0 0 1.5em;padding:0 0 1.5em;
             }

  1. It is better if you divide into two parts like below


.sidebar .widget{
border-bottom:1px dotted $bordercolor; 
margin:0 0 1.5em;
padding:0 0 1.5em; 
}


.main .widget {
  border-bottom:1px dotted $bordercolor;
  margin:0 0 1.5em;
  padding:0 0 1.5em;
}

  1. After you divide, then you must add the code for background color (please refer to this site for getting color code), change red color with color code whatever you like
.sidebar .widget {
background
:#FFFFFF;
border:1px solid
#CCCCCC;
margin:0 0 1.5em;
padding:0.5em;
}

.main .widget {
background
:#FFFFFF;
border:1px solid
#CCCCCC;
margin:0 0 1.5em;
padding:0.5em;
}

  1. Copy and paste above code into your template, if you use new blogger, you can add under widget code. Then “Save” it.
  2. The CSS code can be changed. You can change the border, margin, padding to adjust your blog. Furthermore, you also can change background with any picture, or anything with your creativity.
  3. In addition, the box on your widget can also be modified to be more bended, just add this below CSS code.

.sidebar .widget {
background
:#FFFFFF;
border:1px solid
#CCCCCC;
margin:0 0 1.5em;
padding:15px;
-moz-border-radius-topleft:10px;
-moz-border-radius-topright:10px;
-moz-border-radius-bottomleft:10px;
-moz-border-radius-bottomright:10px;
}

Tuesday, May 3, 2011

How To Remove Or Hide Navbar On your Blogger


If we look at the original Blogger blogspot, there have a navigation bar above right, today I am going to teach you how to remove or hide from view of our eye. Currently, webmasters usually remove the navigation bar in order to looks professional, you also can remove or make it disappear the same with other Blog does it. It is very simple by following some simple steps below you can definitely do it. The screenshoot of navbar something like below:


There have two ways of adding CSS code inside your Blogger, First is like below:
  1.  Log in to your Blogger account
  2. Choose Design> Edit HTML (important: always backup your HTML code)
  3. Add the following script below just after Head:

   #navbar-iframe {
   height: 0px;
   visibility: hidden;
   display: none;
   }

Or you also can use this code:
#navbar-iframe {
   display: none !important;
}

for example:


Second way is by adding CSS code just after <body>

<style type=’text/css’>
#navbar-iframe {display:none;}
</style>
After everything is done, just save it and see the different of your Navbar
  
Removing Navbar is legag or not?

The Terms of Service for Blogspot.com do not mention anything about Blogger Navbar but it does state a word about the discontinued Blogger AdBar which was previously displayed on freely-hosted Blog*Spot blogs. 

By creating your BlogSpot Site, you agree that Pyra has the right to run such advertisements and promotions.

You also agree that you will not attempt to block or otherwise interfere with advertisements displayed on your BlogSpot site via JavaScript or any other means. Doing so is grounds for immediate termination of service. The manner, mode and extent of advertising by Pyra on your BlogSpot Site is subject to change. 

Since it is not mentioned explicitly in the Terms of service, it remains doubtful if removing and hacking the Blogger navbar is any violation of the Blogger terms of service. Lets say we are not "removing the navbar" but only "hiding the navbar" or we could even re-position the navbar to the bottom of the blog. Get rid of the blogger navbar.

Friday, April 29, 2011

Optimizing Blog By Adding Meta tag


It goes without saying that concern of optimizing Blog is absolutely important for you, it is because Blog need to be improved time by time in order to become more popular. Moreover, to make your Blog to be recognized by people you must understand Search Engine Optimization (SEO). And one of tool that bring much impact by adding "Meta Tag" which means this is part of SEO, so that i strongly recommend you to use Meta Tag inside your Blog. The benefit of adding Meta Tag is to "Help you to be a top ranking in search engine". and many webmaster use Meta Tag to optimize their Blog.


Generally, Meta Tag is divided into four components:
  1. Meta the title, you can type Blog title between <TITLE> and </TITLE>
  2. Meta Description, write your description for your Blog
  3. Meta Keyword, this you must to type at least 10 different keyword that representative your Blog. NOTE: do not reply the keyword more than 3 time or it can make your Blog looks like spam even can be banded by Google.
  4. Meta Robot, This lets you specify that a particular page should NOT be indexed by a search engine. To keep spiders out, simply add this text between your head tags on each page you don't want indexed. The format is shown below (click on the picture if you want to copy and past the HTML
Now, you already know four main components which will be added into your Blog. I will teach you how to add Meta Tag into your Blog by simply follow steps below:
  • log in to your Blogspot, choose "Design", "Edit HTML" before you add or change something to HTML code it is better you save the template first. 
  •  Now, check the box "Expand widget" then try to find the <HEAD> by using Ctrl+F.
  • After you find it, just copy and paste the Meta Tag code below under <HEAD>
<head>

<title>your Blog title</title>
<meta name="keywords" content="
keyword 1, keyword 2,...keyword 20"  />
<meta name="description" content="
write some description about your Blog, don't too long or short" />
<meta name="author" content="
Your Name" />
<meta name="ROBOTS" content="ALL" />

</head>
  • In some case, you also can add your name inside as well. Watch Video How to add Meta Tag
  • After you put the following Met tag HTML code, save it. If there is nothing wrong means that you has added Meta Tag successfully. For more about adding Meta Tag refer to Here .Good Luck

Wednesday, April 27, 2011

Add Cbox comment to Increase Blog Visitor

If you are walking through others Blog site, some of them might have a place like a "Box" to chat on each other. This widget is actually very useful because at the time visitor come into your Blog, they can drop their comment as well as address of Blog. One of the best Shoutbox is called "CBOX" which is helping you to make your Blog looks more interactive. Beside that, by having a CBOX, you will definitely get a lot of friends from around the world and the good thing is you can visit back their Blog or Website too.

Now, you already know the benefit of adding CBOX into your Blog. I would like to teach you how to add CBOX into your Blog as a widget. Some simple steps are explained below:
  • Visit www.cbox.ws for register please click "Sign up" and fill up all information below

  • After that, click "Create my Cbox
  • Put both Login name and Password
  • To get HTML code of widget just find which is located next to Home, click "Publish"
  • Next, you will see HTML code, copy and paste into your Blog. 

  • You need to login to your Blog, then choose "Design">"Page element">Add Gadget>choose HTML> paste the code inside and save it. Try to view Blog, the cbox looks like below
Nice right, let your friends comment what they are thinking for your Blog or just visit as a blogwalking. Good Luck

    Thursday, April 21, 2011

    Earn money with Amazon Affiliate Marketing

    Coming up with Affiliate marketing program is one of the best choice that you must to consider. It is because most people who have a website or Blog intent to use as maximal as possible. Means that you can write your article as well as earn money from there so that this yours opportunity, more importantly if you have a huge traffic in your blog. Today, i am going to share for making money with one of Affiliate marketing called "AMAZON". This affiliate program offer you many staff that you can sell it.

    Generally, i will explain to you how the Amazon affiliate program works:
    1. You just need to put advertising like picture, link into your Blog
    2. At the time people click through the advertising, the visitor will be brought  through Amazon website
    3. if they buy from your link, you will get some commission.
    Now, i will teach you how to earn money with affiliate marketing, here are some simple step below:

    • type your email address, you can choose "I am a new customer"

    • put all the information which has been given to you as well as your account information and "Continue"

    • type your website profile information include your website content and subject.
    • the amazon will offer you the term of condition (please read before go to the next one)
    • After that, you will get confirmation about thank you for applying to the amazon.com affiliate program, in this section you will get the unique Associate ID

    • Choose the payment method which has three choice: Pay me by direct deposit, Pay me by Check, Pay me by Amazon.com Gift card.

    • The last step is you will be brought through the main dashboard amazon affiliate, in here you can start choosing type of advertising you like.

    To add HTML code of amazon is easy, you can choose link & banner or Widgets. then choose type of banner display to get HTML code, copy and paste into Gadget from your blog. The advertising can be on sidebar, header, footer, even inside post. Here is an example Blog which add amazon affiliate visit http://trustbookstore.blogspot.com Good Luck

      Thursday, April 14, 2011

      The Best 6 Programs To Earn Money Online

      Currently, Blog is not just for posting an article which content information. But today, the owner of Blog can definitely earn money from their Blog. Moreover, Blogger lets you to make money by adding various ways to make money online which has been provided by Other website. How Blog can earn money? Actually, beside you write some articles into your Blog, you also can add some Advertising in the middle of writing an article or put advertising around your Blog such as on Widget, Header, Footer whatever you like to put it.

      Today, i would like to share what kind types of advertising which be able to earn money for you. Basically, there have many ways to earn money but in this part i will explain 6 common program below:
      1. Affiliate Marketing, this program will pay you if you can sell some product through your Blog, example: you join in Amazon program affiliate and put the advertising product into your Blog, one of your friend click and do an transaction so that you can earn money, usually as a commission (in percentage).
      2. Pay Per Click, this the most preferable program of webmaster because you will be paid when the visitor click through advertising only, that is very simple and many of Webmasters use this program to earn money, even can earn thousand of dollar. One of popular PPC program is called "Google Adsense".  
      3. Paid To Click, you can earn money for just clicking advertising which is provided by PTC program. the amount of money depends on Advertiser start from $0,01-$1, the payment gateway is using Paypal, E-Gold, Alertpay. PTC is the most easiest way to earn money.
      4. Paid To Review, this program will pay you if you review a product in particular like writing and explain the product into your Blog. This program is very interesting because they may give you much more money than other program, you can earn money every post review of their product even you can ask how many money you want to be paid off. But, Paid to Review program sometimes need a Blog which has  high Rank or much visitor.
      5. Pay Per Post, this program will pay you the money every time you post your article and the Business provider will value how good your article, if the article has a much benefit, they will pay you more than usual price. 
      6. Paid To Surfer, you will get paid at that time you are browsing through the internet by show their pop up of advertising. the more you are surfing the internet, the more money you can earn. 
      These 6 major program of getting money through the internet you should join up.  In conclusion, some of tips to choose the right program is by looking at how log this program ever as well as proof of payment. I will discuss program one by one in the next post so "Don't Miss It".

      Analyze Your Blog Traffic By Adding Alexa Analytical


      Today, i am gonna talk about another "Web Analytical" which is called Alexa. This site is actually having the same feature like Google Analytical. It means that Alexa provide various features of analytical. Moreover, Alexa is one of the best tool that you must have inside your Blog, so that i will strongly recommend you to add this Analytical tool.

      Some of tools and benefit that you can do an analysis for Blog optimization like below:
      1. Alexa will record what to be the top search queries among your articles.
      2. Traffic statistic like Average Load Time, Demographic, Where visitor go on and many more.
      3.  Some websites provider for making money online, sometime they will determine whether you have a good Alexa analytical or not.
       Basically, there have some easy steps that you should follow in order to submit your Blog as well as add Gadget on your Blog, just do it now:
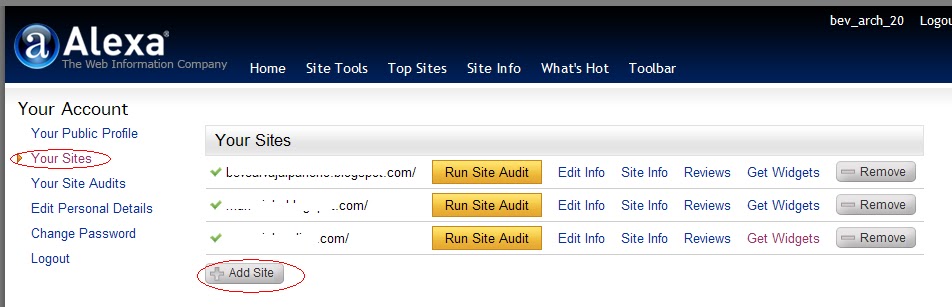
      • you need to register first just visit www.alexa.com. After that, you can login
      • Next is to add your Blog URL by click "Add Site" 

      • Claim your site
      •  To make Alexa be able to record your Blog data, there have two ways, upload on root directory or add into meta tag. 

      •  I choose of using Meta tag, the frist step is to open your Blogger Account> go to design> Edit HTML then find <head> (control F) and put the HTML script just before <head>, the illustration like below:
                <head>
               <meta content='xxxxx' name='alexaVerifyID'/> 
               </head>

               Please change red color with unique ID from Alexa, then save it
      • Now, choose "get widget", under this widget you must choose one of three choice like Alexa traffic Rank button, Alexa traffic Graph, Alexa Site stat button, then click "Build Widget".

      •  After that, you will be given HTML code, Copy and Paste into your Blog by choose "Design", "Add Gadget", "Add HTML". then save it. Now you have a Alexa widget which ready to record and give traffic information from your Blog. Good Luck
      Related Posts Plugin for WordPress, Blogger...

      Subscribe via email

      SIGN UP now if you feel useful information as well as receive other site updates!